In this post I will extend the previous example, by making the web application call a web api secured using Azure AD.
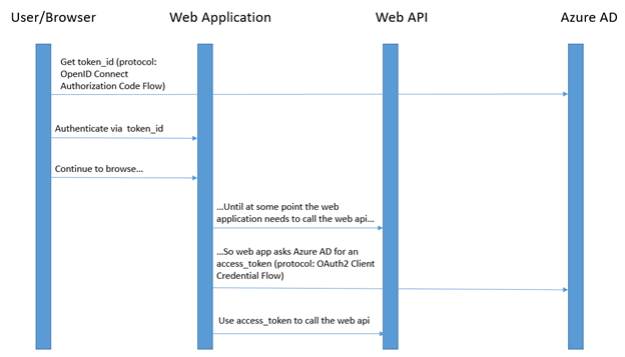
Now let me clarify this: the user will use OpenID Connect to authenticate to the web application, exactly as we saw in the previous post – in fact I’m reusing the same exact sample.
However, the web application at some point needs to call a web api which itself is protected using Azure AD and OAuth2. In this case the web application is the client and it will ask Azure AD for an access token to access the web api (using the OAuth2 Client Credential Flow); and this access token has nothing to do with the id token which was issued to the user to log in to the web application.
Here is a simplified conceptual illustration showing the main artifacts (not showing the protocol dance):
Register Web API in Azure
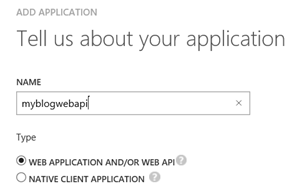
First thing we need to do is to register an application for our web api which we will create in a moment. We follow same process as before; from Azure portal in the our AD we create a new Application:
I will use the same name of my web api project which I will create in a moment:
Once again, I will use the SSL URL:
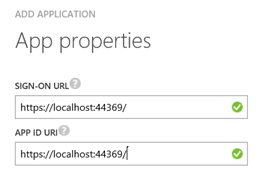
Again remember that the App ID URI does not have to be the same as the Sign-On URL, it just has to be unique within the directory. For simplicity I’ll keep it the same.
Create Web API Project
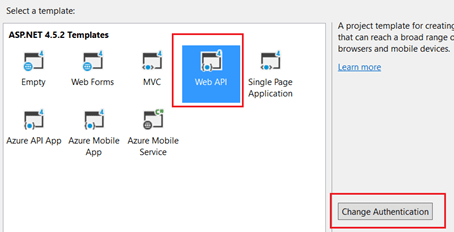
Now let’s create the Web API project. Remember to select “Change Authentication” and select no authentication as we will be configuring authentication explicitly.
Next we need to add a couple of Nuget packages:
- Owin.Security: which contains the core types required to setup OWIN authentication middlewares
- Owin.Security.ActiveDirectory: this is a specific OWIN middleware to support authentication using Azure AD
Now create the startup file to wire the OWIN pipeline, and add the following code to enable Azure AD authentication (i.e. as I explained before, which means the Web API accepts access tokens for authentication):
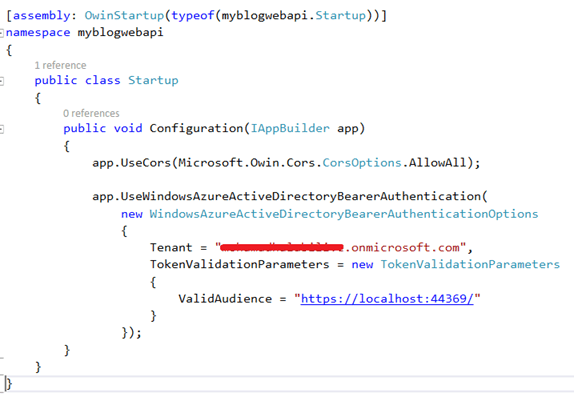
The Tenant is the same one we saw before: [myaccount].onmicrosoft.com
The ValidAudience is the URI of the web api itself (the one used when registering the application in Azure). This means that later when callers (i.e. the web application) submit their access token to access the web api, the access token must be issued for this particular audience (i.e. the web api itself). Obviously this is a security mechanism so that if a client has got an access token for some other web api, it cannot be used to access this particular web api.
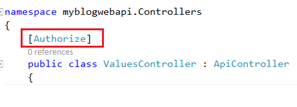
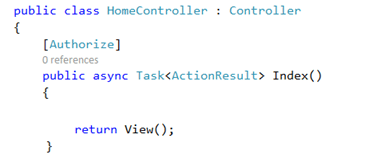
Finally, add the [Authorize] attribute to protect the default ValuesController:
Configure the client web application
As I said at the start, I will be using the same web application from the previous post (myblogwebapp). We have an Azure application already registered for this:

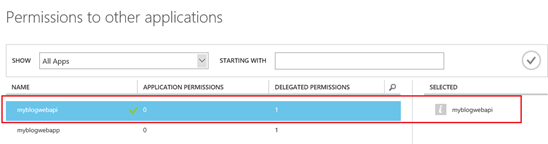
Now in order to allow our web application to call the api, we need to explicitly allow this.
In Azure portal, from the web application configuration, select Add application:

Then select the api which we registered:
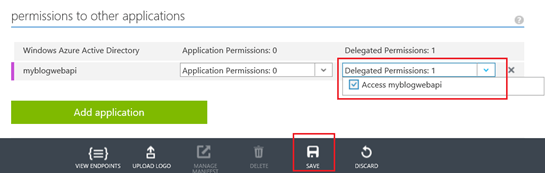
Finally, enable the delegated permission, and hit Save, as shown below:
Getting the required credentials
Recall that we’re in the Client Credential flow; meaning the client – in this case the web application – owns the credentials that calls the resource (i.e. the web api). As such we need to acquire this credential.
From the portal (within the same configuration page), generate a key, and hit Save:
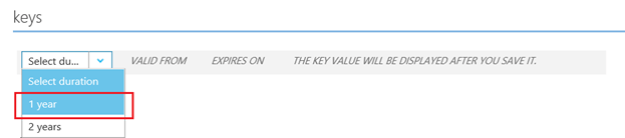
This key will be used to call the web api. Copy and save this key (as you won’t be able to retrieve it again once you move from the page); we will use it in a moment.
Calling the web api from the web app
We have already added the required packages to the web application in the previous article.
But now there is one more package we need for the web application to act as a client and make an authenticated call to the web api:
- IdentityModel.Client.ActiveDirectory: contains the types of ADAL (Active Directory Authentication Library); the client library that facilitates Azure AD authentication over various platforms.
Now we’re ready to call the web api from the web application. For simplicity I will place the code inside the Index ActionResult; meaning as soon as the user is authenticated, the code that calls the web api will run. Obviously in a realistic application calling the web api will happen at some stage when the user is browsing a certain area which requires invoking the api to perform some action…
Now in the previous post, we left the code as follows as we placed the [Authorize] attribute on the Index ActionResult (again this triggered the user authentication flow):
Now change the code to read as follows (Warning: obviously this code lacks any sort of exception handling logic – do not judge me, it’s just coding for fun 🙂 ):
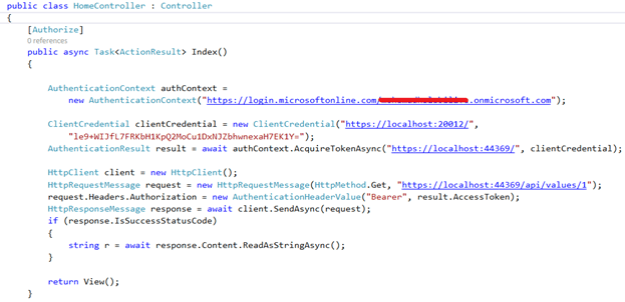
Here are some notes:
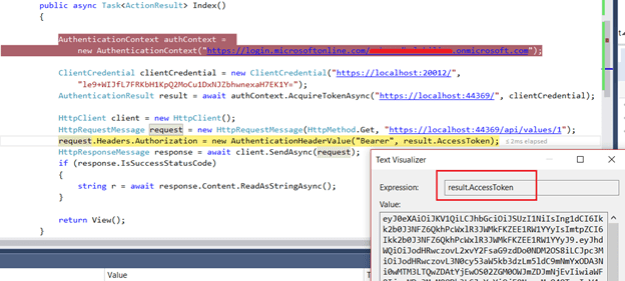
- The Index ActionResult is made as async as we will be making asynchronous calls (with await) inside this method
- The ClientCredential class is the core of the Client Credential Flow. It accepts the URI of the client making the call (in this case the web application which has https://localhost:20012/ as the URI), and the key which we generated from the portal and I asked you to save for later
- The AuthenticationContext class has an AcquireToken method which accepts the client credential and issues an access token for the specified resource (which is the web api with URI https://localhost:44369/). Remember when we allowed the web application to invoke the web api from Azure portal?
- Finally, we use the good old HttpClient to issue a GET request to the web apo passing the access token we just retrieved
A note about bearer tokens:
In case you’re unaware of it, the tokens we issue in OAuth2 are called bearer tokens. In the above code when specify “Bearer” this means that the token will be placed in the Authorization HTTP header when calling the web api.
Now limiting support to bearer tokens is actually one of the criticism of OAuth, because it means that the token itself is not encrypted. The communication must be done over TLS for secure transmission of tokens. Although TLS is almost always used, however, there are two potential issues:
- First, it’s easy for developers to bypass SSL validation through code
- Recall that SSL does not support end-to-end security in case of an intermediary; this would be only supported via custom encryption/signature over the message level
This by the way is one of the strengths of WS-Trust/WS-Federation where we can use proof of keys to provide custom security of (SAML) tokens…
Run the application
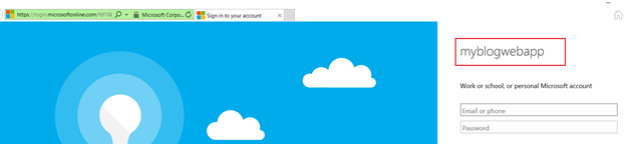
Finally, run the web application.
As before the user will be asked to login; nothing new so far:
After login, the code to invoke the web api now runs, and as you can see below, we have retrieved the access token from Azure AD, and now we can call the api using this token: