The need for WS-Trust
Introduction
In a previous article I talked about how clients use WS-Security to authenticate themselves to services using variety of tokens. So if authentication is covered by WS-Security, what exactly does WS-Trust bring to the table?
To answer this, let’s consider the simple scenario of a client wanting to authenticate to a service. As you have seen before, the client will have to present its token to the service. So the first clear disadvantage is that the authentication logic is actually part of the service. Services should satisfy business needs only, and service developers should worry about business only. Anytime spent creating authentication logic is a wasted time from the perspective of business.
Now, what if the service – who used to accept username tokens for authentication – had its policy changed, and now requires client certificates? This requires change to the service policy and code because authentication logic is actually part of the service.
Now let’s add an extra bit of complexity: say that an organization publishes multiple services, that all require the same authentication, but each service has different authorization rules. This means that the any change in security requirements of the organization, will result in a redundant effort for each of the services. Not only that, but also the client has to set up its authentication requirements with each of the services even though they only differ in authorization rules.
WS-Trust to the Rescue
WS-Trust solves these concerns. It defines a service called a Secure Token Service – or STS – that manages security tokens, and a set of protocol messages for the STS to issue, renew, validate and cancel security tokens.
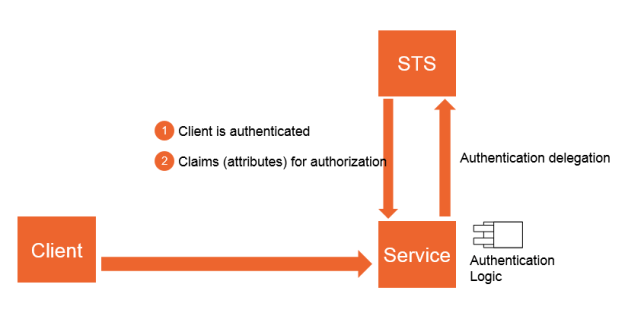
Using WS-Trust, a service or a set of services, delegate the authentication responsibility to a Secure Token Service (or STS). This STS abstracts all authentication logic and gives services back only what they need: is the user authenticated or not, and some information about the user (called claims or assertions) that lets services take authorization decisions.
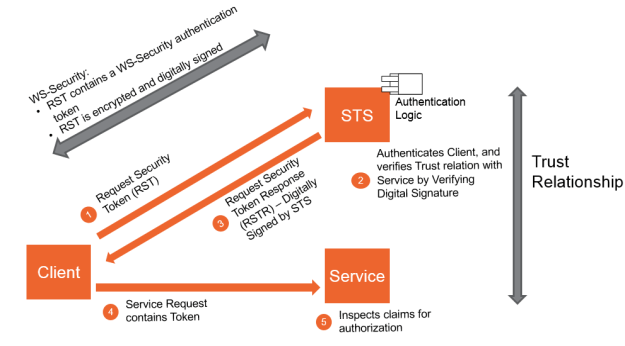
Trust Scenario
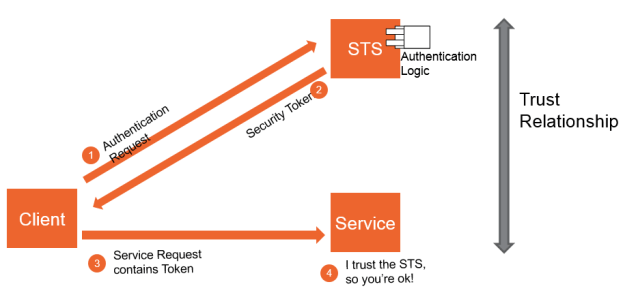
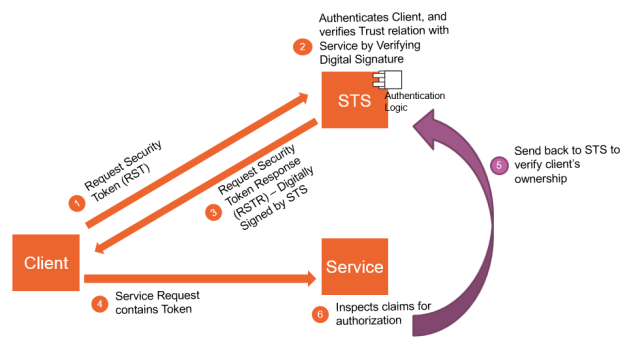
Let me clarify this with a high level example, in the next section I will dig deeper:
- A service establishes a trust relationship with an STS which contains the authentication logic for the service. In the next section, I will talk how exactly this trust relationship occurs.
- A client application wants to invoke the service, and instead of authenticating to the service directly, the client authenticates to the STS. The client might authenticate using a username token, a binary token, or any kind of authentication mandated by the STS. The important thing is that it’s the STS that now validates the user.
- The STS authenticates the client and – assuming successful authentication – issues a security token which contains a set of claims. I will talk more about claims later, but in summary claims are information about the client. For example, name, role, age, group, location…any information that will later help the service authorize the client.
- The client now presents this token to the service as part of invoking the required operation
- Because the service trusts the STS, it knows that the client is authenticated. This actually is a simplification, because in most cases, a method known as holder-of-key confirmation is needed so that the service knows for sure that the client is not spoofing the token. I will talk about this in the “Proof of Possession Tokens” section.
- Finally, all the service has to do now, is to examine the claims inside the token to know which actions the client is authorized to take
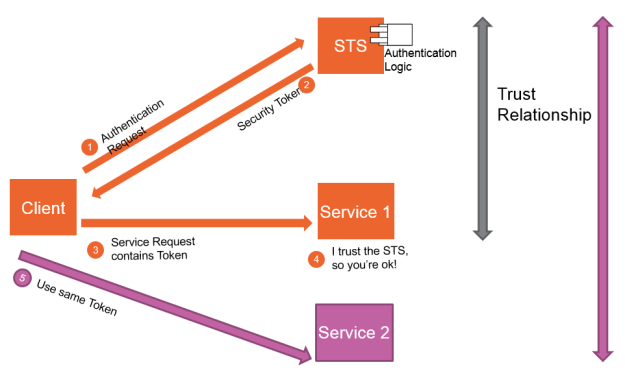
This becomes even more valuable when applied to the multiple services scenario I talked about before. In this case, because the client is already authenticated once by the STS and it has the security token which is trusted by all services within an organization, the client can then present the same token to all services without the need to go through the same cycle again. Each service then, inspects the claims inside the token, and decides on the authorization based on its own rules.
More about Secure Token Service (STS)
Secure Token Service (STS)
In the previous section, I said that one of the main benefits of WS-Trust is removing the authentication logic from business services and delegating it to a separate Secure Token Service.
This of course means that the authentication logic is still very much an essential part of the setup and it is not going anywhere. It’s just being moved to another service.
This means that the responsibility of writing this code does not fall anymore on the shoulders of the same developers whose main concern is fulfilling the business requirements of the services. This way you can have a separate team specialized in security development, which takes the responsibility of creating and managing this STS.
That being said, there are a couple of points that worth highlighting in this discussion.
Developing an STS
First, you must know that STS development is by no means an easy task. That is why, beyond development and testing, its very rare that an organization creates its own STS. Creating a production STS requires a very delicate implementation of WS-Security and WS-Trust standards. Something which is unlikely to be done frequently, either due to lack of skill, or due to time constraints.
Therefore, most often organizations will rely on commercial STS products, such as:
- The Active Directory Federation Services (ADFS) v2 from Microsoft
- IBM Tivoli Federation Manager
- And Oracle Identity Manager
Microsoft provide a local STS for development purposes if you’re using VS 2012. If you’re using a higher edition than you can use Thinktecture’s local STS as an option.
STS Authentication Mechanism
The other thing that I want to point out, is that the mechanism by which the STS actually authenticates clients, is not part of the WS-Trust specification.
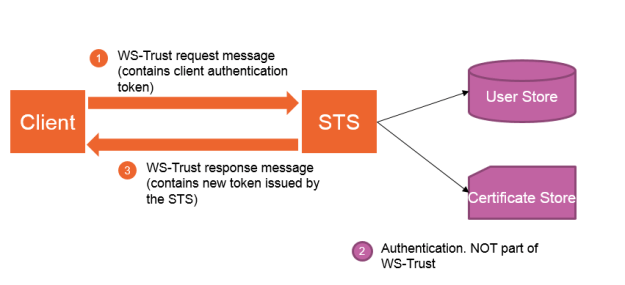
The client sends a special message (which I will explain later). This message is part of the WS-Trust protocol and it includes the client information as mandated by the STS. The STS might mandate a username token, a binary token, or whatever information mandated by the policy between the client and the organization exposing the STS.
The STS then authenticates the request…something which is not related to WS-Trust. This again can be against a database or validating a client certificate. This depends on the token submitted by the client.
The STS finally, replies with another WS-Trust message which contains the news security token.
STS as a Token Transformer
This is why, it is often said that an STS acts as a token transformer, because it accepts authentication tokens from clients in variety of formats, and then produces signed security tokens possibly in a different format altogether.
For example, it is a common case for clients to send the STS a binary authentication token containing a client certificate, who after successfully authentication that client, generates a SAML security token and gives it back to the client.
SAML tokens are discussed later.
In the next section and in the WS-Trust Messages section, this will become more clear as you understand how WS-Trust and WS-Security work together.
WS-Trust and WS-Security go Hand in Hand
While WS-Trust changes the way authentication takes place, it’s no replacement for WS-Security. Actually, WS-Trust builds on WS-Security and they are almost always used together.
WS-Trust and WS-Security Working Together
To best describe this, let me again revisit the authentication scenario you saw before, only this time I will give more details about how WS-Trust and WS-Security work together:
- A client wants to access a secure service which has delegated its authentication to an STS
- The client issues a WS-Trust request message, called a Request Security Token (or RST). You will see this message in a later section, but in summary it’s the request which tells the STS that the client wants to get a token to access a specific service (or a set of services)
- Now the important thing to note here, is that everything you learned about WS-Security in the previous module, still applies within the communication between the client and the STS
- What this means, is that the client must be authenticated by the STS. This often is implemented using WS-Security security tokens.
- Also, the RST message itself must be protected against intruders for privacy and accuracy. This again means that WS-Security encryption and digital signature must be applied. So all what you learned about public key exchanges, symmetric and symmetric bindings, and derived keys still apply when securing the message exchange between the client and the STS
- Now the STS authenticates the request. It also verifies that the service the client is asking to access, does have a valid trust relationship with the STS. This includes having the certificate of the service installed in the STS store.
- The STS then generates a WS-Trust message called a Request Security Token Response (or RSTR). This message contains the security token that holds the claims for the client. The STS signs the token with its own private key so that it can be later verified to be trusted by the service. The STS then sends this response back to the client again using WS-Security.
- The client now presents the token to the service. Because the service has already established a trust relationship with the STS, it verifies that the token is signed by the STS, and thus knows that the client has been authenticated by the STS.
- The service now inspects the claims inside the token to take the appropriate authorization decisions.
As you can see WS-Trust and WS-Security work together to facilitate the trust scenario:
- While WS-Trust specifies how tokens are requested and issues
- WS-Security ensures that WS-Trust messages are properly secured
Security Tokens
An STS can issue a variety of security token formats, these can be:
- Username tokens
- 509 tokens
- SAML tokens
- Or even custom tokens
The important thing about these tokens is that they contain claims about users or clients.
For example, an X.509 certificate contains a claim that a public key belongs to a certain entity identified by a Common Name (CN). This claim is typically made by a Certificate Authority as we have seen before.
Similarly, a username token actually contains the simplest form of claims, and that is the username itself.
In general, any information about the client – or more generally the subject as called in claims-based architecture – can be considered a claim.
However, needless to say, such claims model would be poor to say the least. That is why SAML tokens are the most widely used type of tokens in WS-Trust scenarios. SAML token define an extensible structure where multiple claims can be added. These claims can carry just about any information about the subject or the client: name, age, group, country,…in short any attribute.
SAML
One confusing thing about SAML (Security Assertion Markup Language) is that it actually consists of two parts:
- a protocol that defines interactions and supported communication protocols (commonly referred to as SAML-P)
- and a token format – conveniently called SAML token
The token specification is separate from that of the protocol, so the token can be used by another protocols. Therefore, it’s very common to use SAML tokens to carry claims in WS-Trust scenarios.
SAML Example
What you see here is a modified display of a SAML token . This image shows you the format of a SAML token, and why it’s really a popular choice to carry claims.
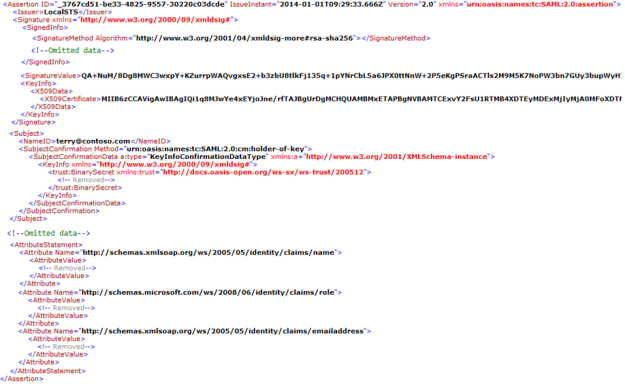
The <issuer> element specifies the STS that created or issued this token. As you will see later in the demo, I will use a local development STS to issue tokens. So what you see here is the name of that STS.
The <signature> element signals the collaboration between WS-Trust and WS-Security I talked about in the previous section.
As I explained before, the token itself is signed by the STS so that later it can be verified to be trusted. The public key that will be used to verify the token is being transmitted as part of the token itself in this case.
The interesting part starts at the <subject> element.
The subject represents the authenticated entity that the token is being issued to. As you will see later in the demo, the development STS by default simulates authenticating user terry in the contoso domain.
What follows is a very important concept known as proof of possession, where the submitter of the token – in this case the client – has to proof that it actually the holds the right to use that token. Because this is an important topic by itself, I will explain it in the next section.
Finally, you see a set of attributes, where each attribute indicates a claim about the authenticated subject.
As I said before, the number and nature of claims you would use depends on each application authorization requirements, and this flexibility is the reason SAML tokens are a popular choice.
Proof of Possession Tokens
To understand what proof of possession tokens are, let’s revisit the messaging of a trust scenario:
- The client sends an RST message to the STS
- The STS authenticates the client, and verifies that it has a valid trust relation with the service that the client wants to access
- The STS then generates a SAML token which contains the set of claims. It then signs the token and passes it to the client
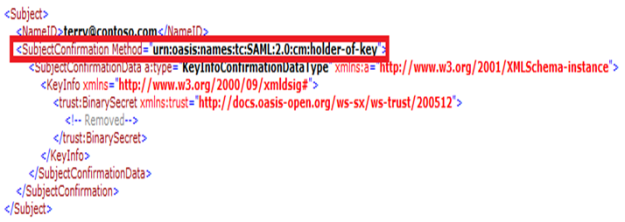
Now you know that the next step, is for the client to submit the SAML token to the service. What happens here exactly, depends on something called subject confirmation method, as defined by SAML profile.
SAML Subject Confirmation method
Subject confirmation, is how the client would prove to the service that it actually owns the token it’s submitting. In other words, the client is actually the subject that the SAML token refers to.
SAML profile defines 3 subject confirmation methods that WS-Trust uses. These are:
- Bearer
- Sender vouchers
- And Holder of Key
When the STS sends back the RSTR message containing the SAML token, it specifies one of these subject confirmation methods in the <subject> element of the token. This example shows you again, the confirmation method used in the token I showed you in the previous section.
Next we will examine the three methods, with a focus on the Holder of Key method.
Bearer
In the bearer subject confirmation method, the service verifies that the SAML token is signed by the STS, but takes no further action to trust that the SAML token is actually owned by the client. Therefore it’s up to the client to make sure that the token is never exposed, because any other client that gets its hands on the token, can then submit it on its behalf to gain access.
The bearer scenario is what I explained back in section 3 to keep the discussion simple.
Sender vouchers
In the sender voucher method, the service sends the token back to the STS to verify the subject. The STS then replies back to the service that the token is verified (or not).
This method is clearly more secure than bearer, but has the overhead of the extra communication between the service the STS.
The method mostly used however, and is implemented by default in WCF, is the holder of key
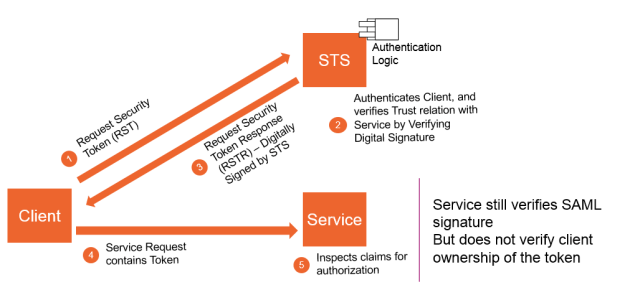
Holder of Key and Proof of Possession Token
In the holder of key method, the STS embeds in the RSTR message a key which acts as the identity of the client requesting the token.
The service then attempts to verify that the identity of the client matches that of the key embedded in the token inside the RSTR message. How does this exactly happen? Let’s find out.
Before starting though, I want to point out that what I will explain will slightly vary on whether we’re using the symmetric or asymmetric bindings. For sake of simplicity, I’ll go with the symmetric binding which as you know by now is the WCF default option.
Please review the previous article for more about symmetric and asymmetric bindings.
To support the Holder of Key method, let’s pick up the process from the step where the STS is generating the token:
- After creating the token which holds the claims, the STS also generates a key – which I will call a holder key. It adds this holder key into the token inside the subject as you have seen before:

- The STS then encrypts the token with the public key of the service. This of course makes the entire token unreadable to the client, including the holder key.
- The STS does one more thing: it also adds a new token called proof of possession token to the RSTR message. The proof of possession token contains the same holder key.
- The STS then encrypts the proof of possession with the client’s public key.
- The STS then sends the RSTR message to the client
- The client uses its private key to decrypt the proof of possession token. Now it has access to the holder key.
- The client then assembles the request message to the service and includes the SAML token in the request header, and then signs this message with holder key. The client then sends the message to the service
- The service uses its own public key to decrypt the token. It then has access to the holder key. Therefore, the service can now verify that the part signed by the client is done using the same holder key; and thus proving that the client is indeed the subject because it’s holding the same holder key.
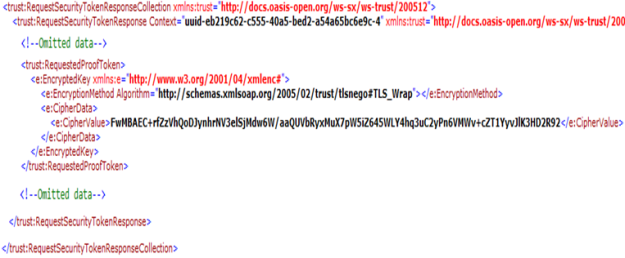
The following modified display, shows the proof of possession token sent from the STS to the client. As you can see, the token is encrypted, and as I explained moments ago, this encryption is done using the client’s public key so that the client can decrypt the token in order to extract the holder key.
WS-Trust Messages
The core of WS-Trust messaging are the Request Security Token (RST) and Request Security Token Response (RSTR) messages. The exact flow of messages vary depending on factors such as the authentication challenges, security contexts in case of WS-SecureConversation is used, and the type of subject confirmation method used.
In general however, RST and RSTR messages are at the core of every WS-Trust scenario.
Request Security Token (RST)
As indicated by its name, the RST message is sent from the client to the STS asking for a certain action on a token.
The client might be asking to issue a new token, to cancel a token, to validate, or to renew a token. The exact type of request is indicated by the Action WS-Addressing header.
Here you can see, the action URIs that indicate the intent of the RST request. The URI ends with a word specifying whether the message is to issue, review, cancel, or validate a token.
- http://docs.oasis-open.org/ws-sx/ws-trust/200512/RST/Issue
- http://docs.oasis-open.org/ws-sx/ws-trust/200512/RST/Renew
- http://docs.oasis-open.org/ws-sx/ws-trust/200512/RST/Cancel
- http://docs.oasis-open.org/ws-sx/ws-trust/200512/RST/Validate
Batching is also supported to avoid repeated roundtrips for multiple token requests. For example, in cases where a client is required to submit multiple tokens to a service, that client might ask the STS for these tokens in a batch request instead of multiple requests:
- http://docs.oasis-open.org/ws-sx/ws-trust/200512/BatchIssue
- http://docs.oasis-open.org/ws-sx/ws-trust/200512/BatchValidate
- http://docs.oasis-open.org/ws-sx/ws-trust/200512/BatchRenew
- http://docs.oasis-open.org/ws-sx/ws-trust/200512/BatchCancel
The following modified display from the demo I will show you later, shows an example RST message sent from a client to the STS to issue a new SAML token.
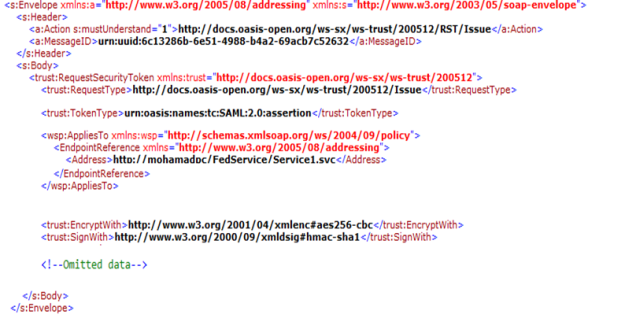
First in the header, the action is set to RST/Issue. This indicates that the request aim to generate a brand new token.
The details of the token request, are available in the body in the <RequestSecurityToken> element.
First the <RequestType> element states that this is an Issue request.
The <TokenType> element indicates that the request is for a SAML token.
The <AppliesTo> element specifies the endpoint reference where the token will be sent to. Endpoint references are explained in the WS-Addressing module.
Finally, the <EncryptWith> and <SignWith> elements indicates the algorithms that will be used to encrypt and sign the token.
Recall that the token will be encrypted by the public key of the service and signed by the private key of the STS.
Request Security Token Response (RSTR)
The Request Security Token Response is the message in response to the RST message.
The following WS-Addressing action URIs in a RSTR message, correspond to the intent of the RST message:
- http://schemas.xmlsoap.org/ws/2005/02/trust/RSTR/Issue
- http://schemas.xmlsoap.org/ws/2005/02/trust/RSTR/Renew
- http://schemas.xmlsoap.org/ws/2005/02/trust/RSTR/Cancel
- http://schemas.xmlsoap.org/ws/2005/02/trust/RSTR/Validate
So if the RST action URI was Issue, then the RSTR message will have a corresponding Issue header. Sample applies for the remaining of the action URIs.
The following modified display, shows a sample of the RSTR message sent by the STS to the client as a result of the RST message you have seen before:
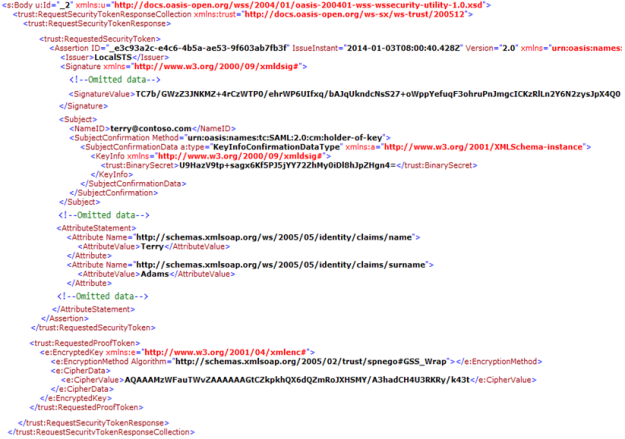
The entire response is wrapped in a <RequestSecurityTokenResponseCollection> element, which includes the <RequestSecurityTokenResponse> element.
The SAML token is represented by the <RequestedSecurityToken> element. I have explained this element before when I talked about SAML.
The <Issuer> element specifies the STS that issued the token
The <Signature> element contains the signature done by the STS on the token. Recall that this is how the service will later verify the token is coming from a trusted STS.
The <Subject> element first contains the <NameID> which refers to the authenticated client.
And the <SubjectConfirmation> element, contains the holder key generated by the STS. Please make sure to revisit the previous section if the concept of the holder key is not clear.
Next is the set of the claims inside the token.
It’s very important to keep in mind that what you are seeing here is the decrypted version of the actual message. The token is encrypted over the wire. I am using WCF tracing to show you the token after being decrypted by WCF.
Finally, the proof of possession token is also sent by the STS to the client. Again, please make sure to review the previous section about proof of possession tokens and holder keys if any of this is not clear.
As a final note, I want to point out that the proof token can be actually sent in a separate message. To simplify things, I modified the display here to show both the SAML token and the proof token in the same message.
WS-Trust (and WS-Federation) in WCF
Windows Identity Foundation (WIF) is part of .NET 4.5, and it provides a set of libraries and tools that:
- Encapsulates WS-Trust and WS-Federation Passive Profile for ASP.NET application, so that you can use these protocols in your applications without having to go into their lower level details.
- WIF also facilities claims extraction and manipulation for both ASP.NET applications and WCF services, so that you can use these claims inside your application to take authorization decisions.
- Also, WIF provides the libraries required to build a custom STS – although as I mentioned before, most often you will be using a commercial STS, such as ADFS, which is in fact built on top of WIF.
Before going further, let me just elaborate on what I just said.
WS-Federation has a passive profile to support web browsers, and an active profile, which builds on WS-Trust to support web services.
When used in web browser scenarios, WIF not only manages claims authorization, but also encapsulates WS-Federation operation via ASP.NET Http modules.
However, when used in rich client scenarios, WIF does not drive the operation of WS-Trust and WS-Federation Active Profile; instead that’s the job of WCF. What WIF still gives however, is plugging into the WCF pipeline, a claims-based authorization architecture.
Configuring WCF Service
As I said, if you’re using VS 2012 you could use a tool called “Identity and Access” to configure your service to talk to a local STS. This tool is not available anymore in higher VS editions. You can in place use a local STS created by Thinktecture – EmbeddedSts – by getting in from VS NuGet manager. You could of course, use ADFS also…
Either case, here are some configurations to understand:
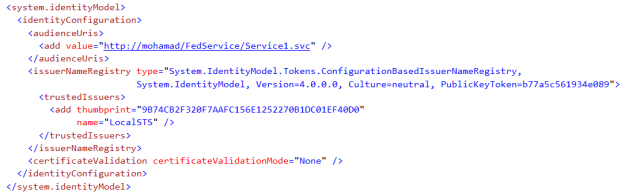
First section to note is the <system.identitymodel>… The System.IdentityModel namespace contain types that are used to provide authentication and authorization for .NET applications…specifically the Claims namespace contains the classes that implement the WCF claims-based authorization model.
The <audienceUri> element specifies the service itself…that is the service which will consume the token generated by the STS. Please note however, that the address you use here just serves as a runtime value when you are using WIF to access claims…this URL is not used by WIF to perform WS-Trust messages…the reason is that – as I explained in the previous section – in WCF service scenarios, WIF does not manage the messaging interaction, this instead is managed by WCF…
Next the <issuerNameRegistry> element specifies the certificate (public key) that the service will use to check the signature applied by the STS over the token…
Finally, you can disable the certificate validation by setting the certificateValidationMode to None…or of course, you can add the certificate to the trusted CA store.
This concludes the WIF specific configurations, so now lets examine, the WCF-specific configuration.
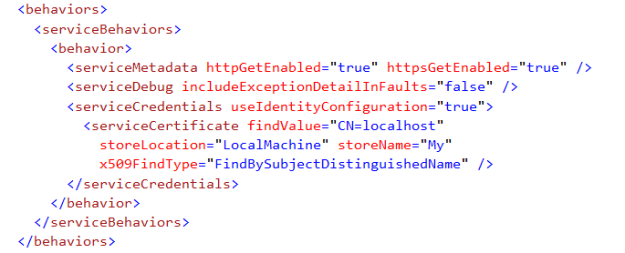
First, notice the use of the <servicecredentials> behavior to specify the service certificate which will be used by the service to authenticate itself to the client…as well as to provide message security.
Please keep in mind, that after the client gets the token, it will engage in a normal WS-Security interaction with the service…so what you have learned in the previous article about service certificates applies here…
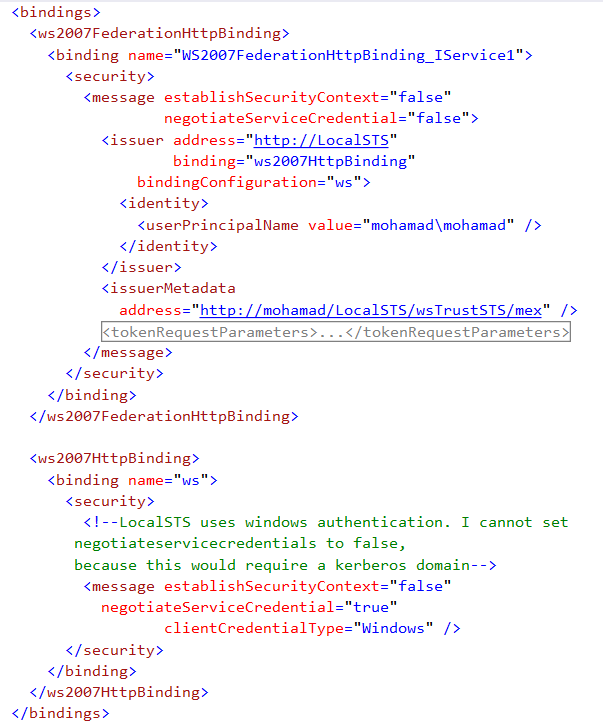
In the binding configuration, the binding used is ws2007federationhttpbinding, which supports WS-Trust version 1.3.

Using this binding indicates that the service will be expecting token-based authentication requests, where the tokens are issued by the specified STS…
Finally, message security is used to secure the requests sent from the client to the service…again I want to remind you, that after the client uses WS-Trust to get the token from the STS, it then sends this token to the service via ws-security.
establishSecurityContext is set to “false”, so ws-secureconversation is not used…as I explained in the previous module, you can enable ws-secureconversation when the client issues multiple requests to the service.
And negotiateServiceCredential is always set to “false” for interoperability reasons…as explained in the previous module.
And finally, the <issuermetadata> element specifies the metadata exchange endpoint of the local STS…metadata exchange is explained in the metadata article.
Configuring WCF Client
First there is an endpoint which the client will send the request to. The address of the endpoint is the secured service itself…
The binding is ws2007federationhttpbinding…as I said in the previous section, this means that the service expects issued tokens for authentication…
The interesting part goes into the configuration of this binding. However, before jumping to this configuration, the endpoint has a behavior configuration which simply disables certificate validation…
And finally, the <identity> element refers to the service certificate which will be used for service authentication and message protection…that is the certificate you saw in the service configuration…once again, if any of this does not make sense, then you need to review the previous article about ws-security…
Ok, now let’s examine the configuration of the federation binding. Let me first get this section out of our way. The <tokenRequestParameters> element can contain child elements that can be used to specify additional XML elements to be sent in the message body to the STS when requesting a token. So, in this case, the XML elements specified in the <SecondaryParameters> element will be sent with by the client to the STS.
<SecondaryParameters> is a WS-Trust 1.3 construct which specifies parameters that are not originated by the requester…this allows the STS to differentiate between parameters that are originated by the requester, and those that are originated by a third party. Practically, in our case, this means that these parameters are not originated by the client. Rather these are required by the policy of the service. This way, the STS can differentiate these parameters and treat them according to its own policy…for example, it can simply chose to ignore them.
The more interesting part is this section of the configuration.
The <issuer> element specifies the information about the STS that the client must contact to get the authentication token. The address is pointing to the local STS – which you will see in a moment…
While the binding is the ws2007HttpBinding…Now do not get confused about having a binding within the configuration of another binding; so let me recap this:
The client, communicates with the service over the ws2007FederationHttpBinding…so this section sets the configuration for this binding.
This means however, that the client must have a valid token from a trusted STS to access the service. So, where is this STS? And how will the client communicate with it? The answer is found in the <issuer> configuration. This configuration says that the client will first contact the STS over the ws2007httpbinding to get the token. The ws2007httpbinding in turn supports WS-Trust version 1.3.
After the client gets the token, it will then contact the service using the ws2007FederationHttpBinding and present this token as the authentication mechanism.
