Sample Code
To run the samples download this solution:
I will point out what each project in the solution does in corresponding section.
Steps Overview to configure WS-Security in WCF
Bindings and Behaviors
In general WCF security can be configured using Bindings and Behaviors.
- Using Bindings you can configure message protection and authentication types.
- Using Behaviors you can configure credentials to be used for message protection and authentication as well as credential validation settings
Security Configuration settings – just like the majority of WCF configurations – can be set in the configuration files or programmatically. There are some exceptions to this rule where some configuration can be set only by code; for example, setting usernames and passwords can only be done programmatically in order not to allow developers to hard code these values in the configuration file.
Overview of steps to configure WS-Security
WCF provides a configuration model to set every aspect of WS-Security. This configuration can be achieved in 3 steps:
In Step1, we set the Basic Message Security Settings:
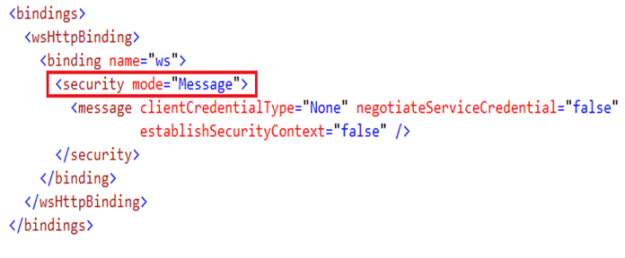
- First, you configure the service to use a binding that supports WS-Security. As is the case in most examples in this course, I will be using the WSHttpBinding
- You then set the service to use Message security. For some bindings, this is the default security mode anyway, but explicit configuration is required when you need to edit the default settings.
- Then you select the sensitive data you want to secure. Recall that a main advantage of message security over transport security is the ability to selectively secure parts of the message, thus reducing overhead.
Next step is selecting the service credentials. These credentials will be used to secure the message exchange with the client. For example, when the service credential is set to X.509 certificate, the public key is given to the client to encrypt messages, while the private key is used by the service to sign the message and authenticate itself to the client.
These credentials will also be used to authenticate the service to the client. This scenario is known as mutual authentication.
Final step is to configure the authentication mechanism the services requires from its clients. This includes setting the type of credentials the service is expecting from the client and how the service will verify these credentials.
Now that I have given a brief overview about the steps required to configure WS-Security in WCF, in the next three sections, I will show you these steps in detail.
Step1: Basic Message Security Settings
Security Mode
The first setting that you’ll typically have to set is the Security Mode of the service. This is a binding configuration where you specify what kind of Message or Transport security you want to use for your service.
Lets quickly review the options:
- None: means that no security is applied. No authentication is required, and neither message privacy nor message accuracy is applied
- Transport: means that transport security is applied. As I explained before, this relies on SSL\TLS.
- Message: means that security is applied using the WS-Security standard. This is the mode I will use throughout this module.
- Both: is supported only by MSMQ bindings, and uses both security and transport security models.
- TransportWithMessageCredentials, also uses both security model for authentication, and transport model for message protection.
- And finally, TransportCredentialOnly, uses transport security for authentication and no message protection.
Protection Level
When the Message security mode is set as I showed you before, by default, WCF encrypts and signs all message exchanges. However, as I explained before, one of the primary advantages of message security is the ability to select only sensitive portions of a message to secure. Therefore, WCF provides the ability to change the protection level.
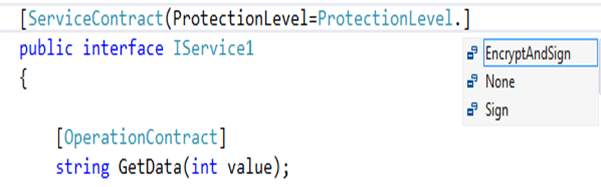
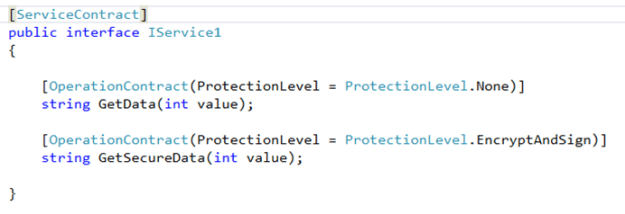
Protection level can be set on a service contract, meaning that the setting you chose will apply on all operations within this contract.
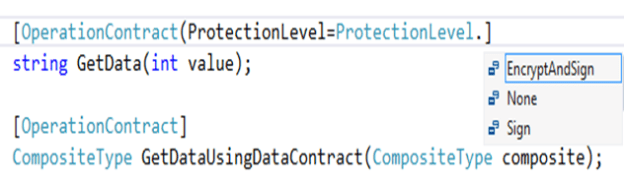
For more control, you can set it on the operation level, to selectively indicate which operation calls to be secured.
Now once you decide on the scope or level of the protection, you can set it into one of 3 options:
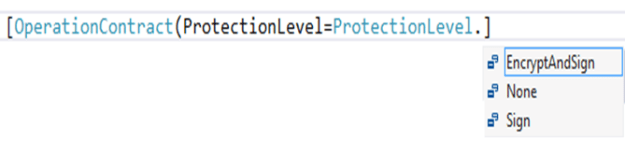
- None: turns off signing and encryption on the operation or the interface
- Sign: applies signature on the operation or the interface, without encryption
- And EncryptAndSign, which is the default option, applies both encryption and signature on the operation or the interface
Using these options, you can now select what sensitive data you want to secure. For example, here I applied the None protection level on a non-sensitive operation, while I used the EncryptAndSign protection level on an operation which will exchange sensitive data:
Algorithm Suite
The algorithm suite setting sets the algorithm used to generate the keys required to implement encryption and signature.
As explained before, to get the best possible security with the least possible overhead, many of the practical implementations use a combination of symmetric and asymmetric algorithms to achieve message security. So the algorithm suite setting typically represents two algorithms: an asymmetric algorithm for deriving a symmetric key, and a symmetric algorithm for encrypting and signing messages using the derived symmetric key.
By default, WCF uses Basic256, which uses RSA-OAEP as the asymmetric algorithm, and AES256 as the symmetric one.
One note worth making here: as is the case in every interoperable scenario, in case your WCF application is exchanging messages with a non-WCF application, then make sure to use an algorithm suite that supported by the other platform. Using different algorithms will fail the message communication.
Step2: Service Credentials
Why Service Credentials?
Having configured the service to use message security and what operations to secure, the next step is to configure the credentials the service will use to secure message exchanges as well as for the service to authenticate itself to the client.
Sharing public key with clients
The service defines a service certificate. The (public portion) certificate is given to the client in one of two ways:
- Either by setting negotiateServiceCredential = “true” in which case, the certificate is transmitted to the client at the beginning of the communication. However, negotiation happens using TLSNego protocol which is WCF specific and not interoperable. Therefore, I will not use this option.
- The other way, is any out of band mechanism so that the client stores the certificate in its certificate store.
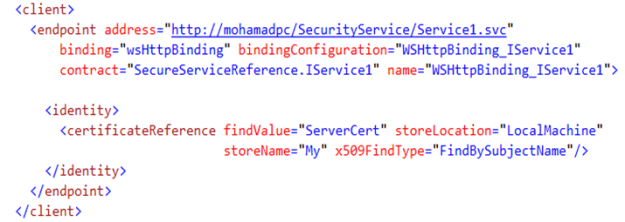
The client now, having the public portion of the certificate, will be able to authenticate the service typically by verifying that the service certificate is signed by a CA that the client trusts; this means the client has the CA stored in its trusted CAs store.
The client can point to the certificate to verify in different methods, for example, here the client says that its expecting a service certificate with subject name of ServerCert, and the client will search for this certificate in its local store. Which means that exchanging the certificate should have happened before any message exchange (again, because negotiateServiceCredential is false).
Message security
Now the exact flow of how message security is achieved, varies depending on whether we are using the symmetric or asymmetric binding, and whether derived keys are enabled or not. But anyway recall that WCF defaults to the symmetric binding with derived keys enabled. So for the sake of completeness, in summary message security flow goes as follows:
- On each request, the WCF client randomly generates a symmetric key.
- The client then derives two keys from this symmetric key. It uses one key to encrypt the request, and another key to sign the request.
- Now, the client uses the public key of the service certificate to encrypt the derived keys.
- It then embeds these encrypted keys in the request header. So the final result, is a message encrypted and signed using the two derived keys, and the derived keys themselves are encrypted using the service certificate public key
- When the request reaches the service, it uses its own private key, to decrypt the derived keys
- It then uses these keys to decrypt and verify the signature
- Now to generate the response, the service again uses the same derived keys to encrypt and sign the response message
- The client remembers the derived keys, so it again use those to decrypt and verify the signature of the response
Step3: Client Authentication
Client Credential Type
As implied by its name, the Client Credential Type specifies the authentication mechanism the service expects from its clients.
Clearly the options here vary depending on whether the Security Mode is set to Message or Transport security. For example, when using Transport security, you’d expect to have Basic, and Digest authentication among the options.
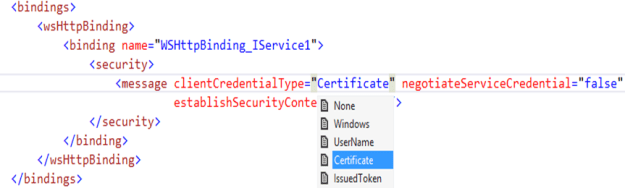
In our case, we’re interested in Message security, in which case, there are the following client credential types:
- None: means that no authentication is required. This is the same as anonymous access
- Windows: indicates that clients are authenticated using traditional Windows authentication through Kerberos or NTLM
- Username: means that clients are authenticated using WS-Security username tokens
- Certificate, on the other hand, indicates that clients are authenticated using WS-Security X.509 tokens
- Finally, IssuedToken, indicates that clients are authenticated using a token issued by a third party. This is commonly used in federated authentication scenarios, which you will see in detail in the next module.
In this article, you will see authentication using username and certificate tokens.
Setting Certificate Authorities and Certificates
Setting up Sample Certificates
For working the next samples, you need service and client certificates.
In this section, I will show you how to set up these certificates as well as the certificate authorities used to sign them. Of course, I won’t be using any production certificates. Instead I will use makecert tool to create self-signed CAs, and then create certificates that are signed by these CAs.
To simulate a production deployment, I will use:
- one CA and one certificate for the service
- and another CA and certificate to the client
Service Certificates
To create the service CA, use the following command:
makecert -pe -n “CN=ServerCA” -ss my -sr LocalMachine -a sha1 -sky signature -r “ServerCA.cer“
- -pe: specifies that the private key is generated in the certificate and installed with it in the certificate store
- -n: specifies the subject name of the certificate
- -ss: specifies the store name. Here I’m storing the certificate in the personal store
- -sr: specifies the store location. Here I’m storing the certificate in the local machine store. Together the –ss and –sr options means that I will be storing my certificate in the local machine store, in the personal store name
- The –a option specifies the hashing algorithm
- While the –sky option, specifies that this certificate will be used for digital signatures. Since this certificate will be acting as a CA, its purpose is to sign other certificates. That is also why I used option –pe to have the private key generated in the certificate; because it’s the private key that will be used for signing.
- Finally, the –r option specifies that the certificate file will be self-signed
Now to create the service certificate, use the following command:
makecert -pe -n “CN=ServerCert” -ss my -sr LocalMachine -a sha1 -sky exchange -in “ServerCA” -is MY -ir LocalMachine ServerCert.cer
I already explained many of the options in the previous command, so I will now only explain the new ones:
- The –sky option is set to exchange; this makes the certificate capable of signing and encrypting messages
- The –in option specifies the common name of the CA signing this certificate. Here I am using the ServerCA I created previously
Client Certificates
Now using the same set of command, I create a ClientCA certificate:
makecert -pe -n “CN=ClientCA” -ss my -sr LocalMachine -a sha1 -sky signature -r “ClientCA.cer”
And use it to sign a ClientCert certificate.
makecert -pe -n “CN=ClientCert” -ss my -sr LocalMachine -a sha1 -sky exchange -in “ClientCA” -is MY -ir LocalMachine ClientCert.cer
For this sake of simple testing, I could have just created a single CA and a single certificate; but to simulate a real scenario where the client will be running on a different machine than the service, I created separate CA and certificate for the client.
Sample: Username Authentication over Message Security
For this sample you will need three projects from the solution:
- SecurityService: This is a WCF service configured to use username token authentication and message security
- CustomUsernameValidator: Component used to provide dummy validation. In your projects, you can use a variety of verification methods, such SqlMembershipProvider for example. The point is that, credentials verification is implementation specific and not related to WS-Security.
- SecurityClient: A WCF client that invokes the SecurityService
Note: in the sample I invoke two methods, one with “None” protection level and the other with “EncryptAndSign” protection level. When you run the same and examine Fiddler, you will notice that the call for the “None” protected method still contains a security header with XML encryption/signature elements; even though the message payload itself is transmitted in clear text. The reason we have security, is because the username token is never by default transmitted in plain text. WCF applied message security, to secure the transmission of the username token. So even though we transmitted the operation itself without message security, WCF applied the appropriate security on the username token.
Tip: Examine the svc Trace Viewer as you will get to see the flow of message security.
Sample: X.509 Authentication over Message Security
For this sample you will need the following projects from the solution:
- CertSecurityService: a service secured with certificate authentication and message security
- MyX509CertificateValidator: I am supplying the simplest possible validation; just by checking that the subject name of the incoming certificate is “ClientCert” which is the client certificate sent from the client to the service
- SecurityClient: WCF client that calls the CertSecurityService
Tip: Examine the svc Trace Viewer as you will get to see the flow of message security.
Reducing Overhead with WS-SecureConversation
The Need for WS-SecureConversation
So as I said before, key generation can be an acceptable solution for a single client to service invocation. However, in case a client is doing multiple invocations over the same session, then key generation can quickly impact performance.
WS-SecureConversation removes the overhead caused by the key generation process at each and every request from the client to the service. WS-SecureConversation builds on WS-Security to establish and share a Security Context Token between clients and services. Session keys are then driven from this token and used throughout the life of the conversation without the need to derive new keys for each call.
To reduce the chance of attacks, this token has a lifetime of 15 minutes and must be re-issued if it is to be used beyond that time.
Security Context Token (SCT)
The Security Context Token is defined by WS-SecureConversation as another WS-Security token type.
To issue the Security Context Token (or SCT), WS-SecureConversation builds on another standard (called WS-Trust) which you will see in detail in a later article.
All what you need to know now, is that the SCT is issued using a WS-Trust message called Request Security Token (or RST), from the client to the service, and given back to the client using another WS-Trust message called Request Security Token Response (or RSTR)
WCF Secure Sessions
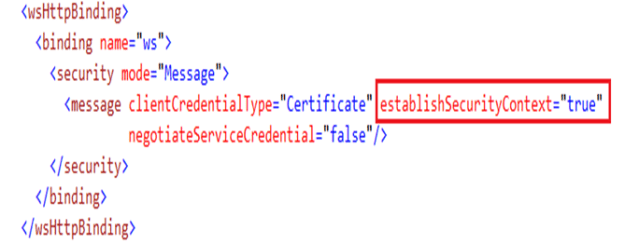
WS-SecureConversation is implemented using WCF secure sessions. A secure WCF session is established in message security by setting establishSecurityContext property to true, which is the default value.
WS-SecureConversation
The flow of WS-SecureCoversation messaging goes as follows:
- The client sends to the service an RST message which as I said is part of the WS-Trust specification. This message includes the client credentials.
- The service receives the message and authenticates the client credentials.
- Assuming a successful authentication, the service then creates a new session token of type Secure Context Token (SCT). The SCT references a derived symmetric key to encrypt and sign messages
- The service sends the SCT back to the client using a RequestSecurityTokenResponse (RSTR) which is another WS-Trust message.
- Now the actual message exchange can begin, and from this moment, the derived symmetric key included in the session token is used to encrypt and sign the message, and the session token itself can be used by the client as its credentials
Sample: WS-SecureConversation
For this sample, use the same service secured via username/password but set the establishSecurityContext to true.
When you do so and examine Fiddler, you will notice you will have 3 requests instead of 2. The third request (or the first in the flow actually) is the Request Security Token (RST) message I talked about.

can’t download proyect, file doesn’t exist. Please upload again
thanks
link fixed