In this post we will examine some of the techniques used to build the Payment Upload process. You will see transactions, debraching messages, streaming and using XLANGMessages.
Download Solution
The Business Process
The process itself is simple, however, as I will show in a moment, to implement it you still need to learn a handful of techniques and best practices.
In the previous processes, the bills were uploaded to the bank. In this process, the bank will notify the gateway once a bill is paid through one of the bank channels.
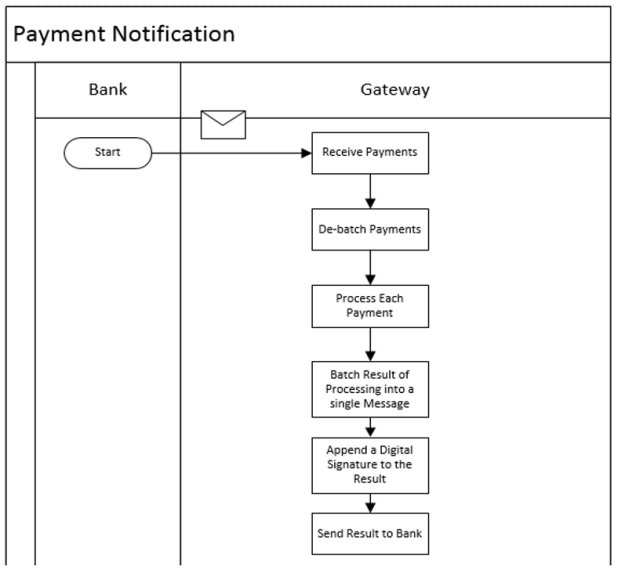
- So the first step in the process is when the Gateways receives a message containing a set of completed payments.
- First thing that the Gateways will do, is to debatch this message so that it can process each payment at a time.
- At the same time, the gateway will assemble a message which is a batch of the result of processing each individual payment.
- Then – as part of the security contract between the gateway and the bank – the gateway will apply digital signature on the message; and then finally send the message to the bank.
Process Explanation
Receive Batch Payments: BizTalk Debatching using XmlNode
Sometimes you receive a single message which contains multiple records, however, you want to process each record separately. Extracting these records is called debatching.
There are multiple ways to do this in BizTalk. Here I will show you one method using XmlNodelist and IEnumerator. In the next article I will use another method using envelopes.
First take a look at the PaymentNotificationRequest message which is received from the bank. This message has a payment record which has its Min Occurrence set to 1 and Max Occurrence to unlimited. This means that it should contain at least one payment. Each payment is represented by this payment info record which contains a set of information about the payment.
In the Ox, the pattern used to perform debatching is simple: After I receive the message, I define an Atomic scope which I will use to implement my debatching logic. The reason I need an Atomic shape, is because I will use XmlNodeList to iterate through the message, and XmlNodeList is not serializable.
Note that this will be introducing a needless persistence point, and preferably should be avoided. However, as a tradeoff, IEnumerator performs well so the cost of persistence point seems acceptable. But anyway, in the next post I will use a different technique using Envelopes which will also perform well.
Even as third solution, I could have moved the entire debatching logic into a serializable .NET class, and thus eliminated the need of the Atomic scope, but I am not really a big fan of this. As long as I can do the business processing inside the Ox, I always prefer this approach. This keeps my business process at a higher abstraction level, and makes it easier to track and monitor.
So first step is to get hold of the enumerator. In the expression shape I first initialize a new XmlDocument and set it to the message I received and I use the XmlNamespaceManager to set the targetnamespace. I then use Xpath to select the record that contains the collection of payments and assign the result to an XmlNodeList; at this stage I have a nodelist where each node represents a payment record. So now I can iterate and process these records one by one. In order to perform this iteration, I get the IEnumerator from the nodelist:
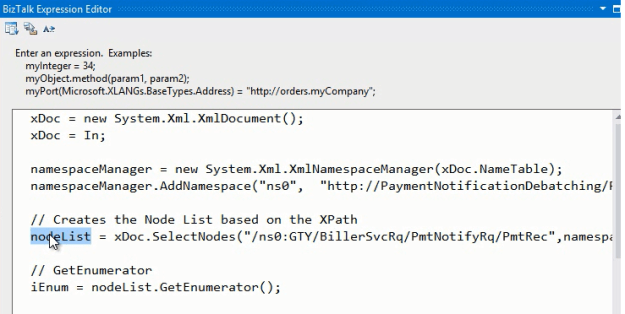
I will use this enumerator in a loop shape to start the actual processing.
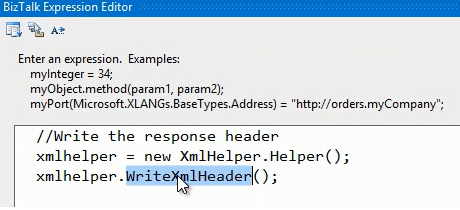
In the next expression shape I call a .NET helper which generates the header of the response message. The idea here, is that I use the Ox to debatch and iterate over the message, however, I use the helper class to process each record; and on the fly build the response. The next section will explain this class and the techniques used to generate the response:
Next I use a Loop shape which uses the enumerator MoveNext method to traverse the XmlNodelist one at a time. Inside the loop shape I use an expression shape (WriteRecord shape): first i get hold of the current node and then again I use the helper component to process this particular record and write a response record for the current node.
This loop will continue until all nodes are iterated and processed by the Helper class.
And finally, after I have finished parsing all payment records I write the footer of the response message (using the WriteFooter shape).
The next construct shape is interesting. Check the enclosed assignment shape: here I could have just asked the .net component to return me an XmlDocument out of the response string I have been building. However, as I explained in my streaming article this is the bad approach. Instead I made the .net component return the message as a stream. In the next section I will explain how this is done.
And now finally, I have the response ready, so I sent it back to the bank using a send shape.
Construct Response Message to Orchestration using Streaming and XLANGMessage
In this section, let’s see the helper class I used to generate the response (XmlHelper project in the VS solution)
First, of course the class is marked as Serializable.
Now, there are 2 core regions, the XmlManipulation and the BizTalk Messaging Manipulation.
The XmlManipulation region is simple. Its purely doing some XML and string manipulation to build up the response.
- Method WriteXmlHeader, is the one I called from the Ox before starting the loop.
- Method WriteRecord is the one called from inside the loop. It takes the current record which is extracted by the enumerator as a parameter.
- It then goes on to do some boring processing. Of course in the real project, that involved true business logic which is not relevant here.
- Finally, WriteXmlFooter method is the one called from the Ox after the loop to complete the response.
Now the interesting part is the one about BizTalk messaging. When it comes to passing messages, pass it as XLANGMessage and not XmlDocument. Here we need to send a message from the helper class back to the Ox.
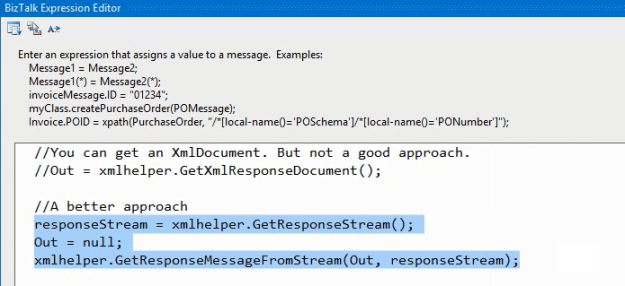
The first method, GetXmlResponseDocument, is the bad practice because its using XmlDocument. This means the message is loaded into memory before being handed to the Ox. I will not use this method; I kept it just to show it as a possible option.
The two methods I will use are GetResponseStream and GetResponseMessageFromStream.
- GetResponseStream first uses a VirtualStream. Recall that VirutalStream acts as an in-memory stream until the message exceeds a certain size, then it dumps the memory into a temporary file and starts using this file as the stream source. Next, I use XmlWriter to write into the virtual stream, the content of the xml string I built before. I then reset the stream pointer back to the beginning. This always should be done, else the next method or component reading the stream will think that the stream is empty. Finally, the method returns the stream.
- Now method GetResponseMessageFromStream, takes two paramters: the stream which is created by the GetResponseStream method, and an empty XLANGMessage. I then use the LoadFrom method of the XLANGPart class to assign the content of the stream to the XLANGMessage. Remember that all messages in BizTalk are considered multipart; and this case, I have single part which is the body.
Back in the Ox…now the code in this assignment shape which creates the response makes sense:
Custom Digital Signature: Pipeline Component Using VirtualStream, XmlReader, and XmlWriter
Digital signatures are supported natively in BizTalk Server. However, in this process I had a special requirement, which cannot be satisfied by the out of the box features.
To see what I mean, lets take a close look at the outbound message:
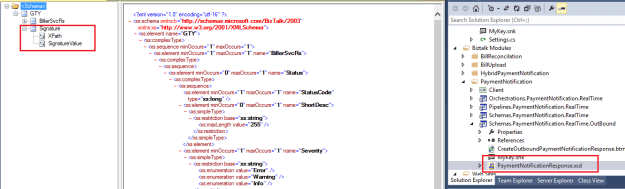
It has an extra element to hold a digital signature, and the path of xml portion of the message that is signed. This kind of requirement, cannot be achieved by BizTalk security features.
So, now the process will go as follows: my Ox will generate the response just as I showed you in the previous section. However, just before the message being sent out by the send port, I will use a custom pipeline component that does the signature and appends the signature to the message. And while doing so, I will again stay loyal to the best practice of using streaming.
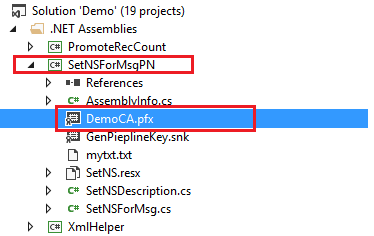
Note that you need a certificate for applying digital signature. I used makecert tool to create a self-signed certificate and I included it as part of the pipeline component project:
For the signing code to work, you need to import the certificate into the Personal Certificate store of the local computer. You also need to copy the certificate into the Trusted Root Certificate Authorities store. This is done so that the signing code would pass the chain validation because we’re using a self signed certificate.
Now examine the code of the pipeline component (VS project “SetNSForMsgPN”):
- I again start with a warning showing you the practice that you should avoid. This practice uses memory stream and XMLdocument.
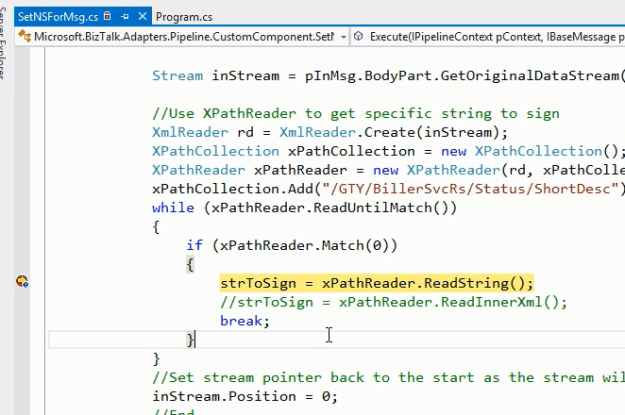
- Now the actual code begins. First thing I need to do is to extract the portion of the message that need to be signed. To achieve this, first I create an XmlReader out of the incoming stream.
- I then use the XPathCollection and XPathReader classes of the Microsoft.BizTalk.XPath assembly, to locate the part of the document to be signed.
- I store this part as a string, which I will use later to apply the signature on.
- Notice here how I avoided loading the message using XmlDocument, and instead used classes from the Microsoft.BizTalk.XPath assembly, to get portions of the message without impacting performance.
The we need to build the outgoing message, including the signature:
- First I use a combination of the Virtual Stream and the ReadOnlySeekableStream to prepare a read-only access to the incoming stream. The ReadOnlySeekableStream provides read only access on a stream, but it also provides the ability to seek inside the stream to a certain position.
- I then create the XmlReader that I will use to read the incoming message.
- Next, I prepare the XmlWriter which will generate the response on the fly. Now, let me recap here for a moment. I need the XmlReader to the read the incoming seekable virtual stream, element by element. Then on the fly, I will use the XmlWriter to build a response message by copying the contents of the incoming seekable stream, as well as supplying the new signature element.
- This logic is implemented, in a while loop.
- First I start reading the incoming seekable virtual stream. As I said a moment ago, this code copies all elements and contents from the incoming to the outgoing stream, but also adds the signature value to the outgoing stream.
- I check the node type the Xml Reader is currently pointing to.
- Lets start with the easy cases; if the node type is the closing tag of an Xml element, or if it’s a whitespace, then I simply write the content as is to the outgoing stream.
- Now if the node type is an element, then anyway, I also write the content as is to the outgoing stream. However, recall that I have a special case about signature content which I have to detect. If the element name is XPath then I need to add a custom content which is the XPath of the portion of the message I am signing.
- And if the element name is SignatureValue, then I need to add a custom content which includes the signature value of the string I extracted at the beginning of this method.
- So, to do so, I set two variables, I then check these variables when the node type is Text.
- If variable isXPathNode is true, then I know that the reader is reading the content of the XPath node, therefore I write a custom content which is the XPath string of the portion to sign into the outgoing stream.
- On the other hand if variable isSignatureNode is true, then I know that the reader is reading the content of the SignatureValue node, in which case I supply a custom content which is the signature of the string to sign.
- This signature is computed using Function SignMessage by passing to it the string I prepared at the beginning of the Execute method.
The SignMessage function is all about cryptography:
- I first get the bytes out of the string to sign
- I then load the certificate DemoCA from the certificate store by using its thumbprint
- I then use this certificate along with .NET Framework cryptography classes to apply signature on the bytes I got from the input string…
- Finally, I encode the result signature and return back its base 64 string representation.
The last thing I need is a custom pipeline which uses this custom component to apply signature on the outgoing message. So in the Pipelines.PaymentNotification.RealTime project I have created a custom pipeline (SignPaymentNotificationRequest.btp) which uses the pipeline component.
Exposing the Service to the Consumer: Using the WCF Service Publishing Wizard
Once the process is ready, we want to expose it to the bank.
- From the Tools menu, select BizTalk WCF Service Publishing Wizard. First you have to select the binding; to keep things simple and not dive into WCF security specifics, i used the Basic Http binding.
- Select the option so BizTalk automatically creates the receive location and configures it. And then continue with the wizard…
- Specify that you want to publish a BizTalk Ox
- then locate the assembly of the Ox
- then specify the ports you want to export
- and then finally you select where you want to publish the service.
Now when you run the process, use the published service to simulate receiving payment notifications:
Running the Process
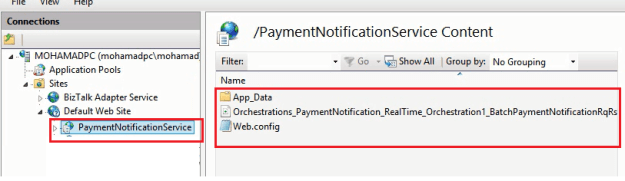
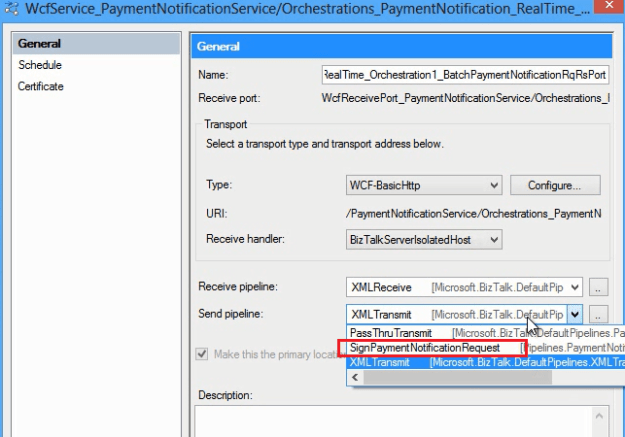
In the administration console, The request-response receive port was created automatically by the WCF publishing wizard. The WCF adapter points to the WCF service also created by the wizard:
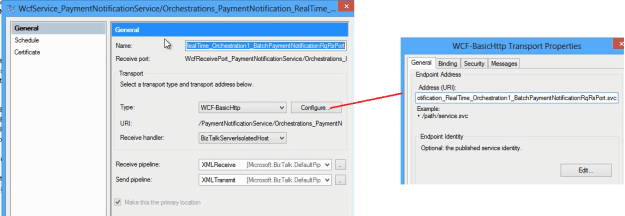
The thing I needed to change, is that instead of the XmlTransmit pipeline, I will use the custom pipeline which contains the custom component:
Now To run the process, I need a client application that sends a request to the receive WCF port. For this, I have a console application as part of the solution (Client.csproj) and I added a service reference to the WCF service. The code simply builds a request message and sends it to the WCF service.
To see this in action, set a breakpoint in the demo application and another breakpoint in the custom pipeline component. Note that to be able to debug the pipeline component, you need to attach the w3wp process because its running under an isolated host which is controlled by IIS (if you have actually published into IIS as I did)
Next run the console application and send the request to the Ox.
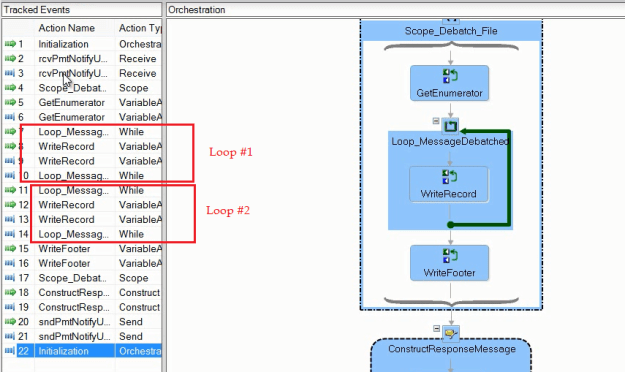
First, verify that the Ox has completed successfully, so from the admin console check the completed Oxs. You should see the process instance. Select the debugger and you should see that the loop was executed twice since you submitted a message with two payments:
However, we know that the response isn’t received yet, because the send port is using the custom pipeline, so I will now step into the code of the signature component:
As explained before, first I get the string to sign, then while building the outgoing message, I call the SignMessage function. Inside this function, signature takes place and finally, I return the message back to the console application.

Thank you For the share, but i hope you replace the download link, because it’s broken.
link fixed