Web applications deployment has always been a tricky task for developers. Developers used to have many ways to perform deployment ranging from X-Copy to FTP to using installers. However, all deployment options have common problems; these are:
- The solution has to be separately packaged. The database is just another package.
- After generating the packages, these should go “somehow” to the destination server and the deployment will happen on that server.
- On the destination server, IIS deployment for the web app and database deployment are two different tasks.
- On the destination server, configuration files have to be edited to reflect on the new environment such as database connection strings.
These problems have just surfaced the difficulties usually associated with deploying large APS.NET applications.
Well in VS 2010 (currently in beta2), there is a huge feature: this is 1-Click Deployment (or publishing). It basically allows the developer to deploy the application along with the database and configuration changes directly from his development box to the destination server with one click!
The technology behind 1-Click Deployment is MSDeploy. VS 2010 uses MSDeploy implicitly to implement the deployment.
In the source server (development box), VS 2010 uses MSDeploy to create a zipped package of your project (containing web app, database with data, and deployment configurations). This package is then sent to the destination server which will have MSDeploy configured to listen to deployment requests and will perform the actual deployment of you web app and your database! Note that MSDeploy is installed with VS 2010 by default.
Well in this article I will show you two walkthroughs on how this is implemented; during which I will try to highlight how stuff is happening…
Deploying on a Hosting Company
When deploying web apps, you usually have two options; you either deploy on a web hosting company or on a server which you own. First let’s discuss option 1.
ORCSWeb (https://www.orcsweb.com/signup/?planid=58) allows you to create free testing accounts to deploy VS 2010 Beta 2 web projects. I have created an account and during the registration process I have selected SQL Server 2008 as my database; because then they will allow you to deploy your app along with the database…
After completing registration, I received an email containing the information I need to deploy. Lets us review the information:
Publish Method: MSDeploy Publish
Service URL: https://SHARED18.orcsweb.com:8172/msdeploy.axd
Site/Application: ITD1.orcsweb (you can optionally append a subfolder name)
Allow Untrusted Certificate needs to be checked.
User Name: itd1
Password: xxxxxx
You can view your site here: http://206.72.116.231/
Additionally, you can deploy a database by going to
the properties of the project and then the Deploy-SQL tab.
Your database connection string is:
Password=xxxxx;User ID=ITD1.orcsweb;Initial Catalog=ITD1.orcsweb;
Data Source=sql08-2.orcsweb.com
The new thing to you might be the “Service URL”. This is the IIS handler which will perform the actual deployment of the application on the hosting server. See in the destination server assigned to me by ORCSWeb, MSDeploy is running and configured to listen to requests on the specified handler to perform the actual deployment. This detail is hidden from you in this case and is done by the destination server admin (ORCSWeb in this case). In the next walkthrough I will show you how to set up your own destination server to listen to requests from VS 2010…
MSDeploy also comes with a SQL handler to perform database deployment. This will also be called implicitly on the destination server.
Going back to the information, I have been supplied by a username/password combination to submit while deploying and with a SQL connection string for my database deployment.
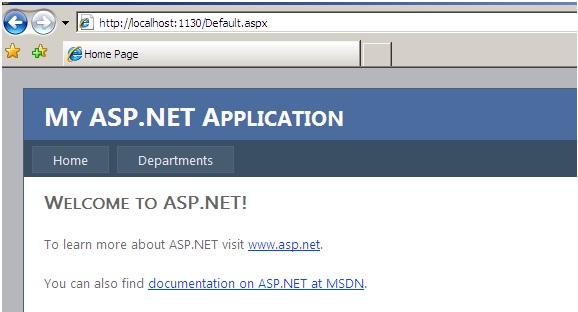
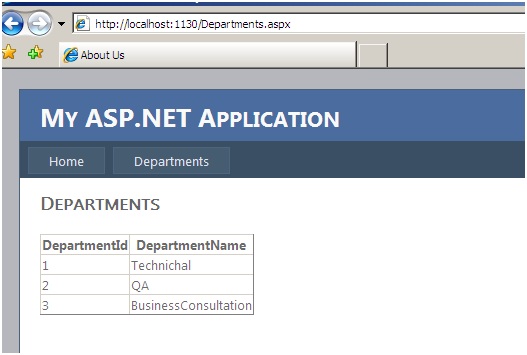
So now let’s see my web app I want to deploy. In VS 2010 I have created the simplest of applications: I used the default web app template and added a second page which reads a list of “Departments” from a SQL Server 2008 table.
The below screen shots shows my simple app:
So now it is time to deploy! Let’s review the three problems that I want to solve for deployment:
- I actually want to deploy the application without manual packaging and without leaving my dev box
- I want to deploy the database along with my app in a single click!
- I do not want to go to the destination server and change any configuration (like database connection string)
To solve the configuration issue, VS 2010 introduces XML Document Transforms (XDT) for automatic configuration changes. You can learn about the complete syntax of XDT from various online resources; however, for the sake of our discussion what you need to know is that VS 2010 allows you to create multiple versions of your web.config and associate each one with a configuration build (for example your application will have the normal web.config file, but it will also have web.config.debug and web.config.release for each of the debug and release configuration builds…you can have more builds as you like; for example web.config.staging…).
Now let’s say that you are deploying your release version; XDT allows you to set a certain syntax in these config files such as while VS 2010 is performing the packaging of your project, the entries you specify in web.config.release replace the entries in web.config and a new final web.config file is created containing the updated configuration…so for example your web.config will hold the connection string for your local database. In the web.config.release you specify the connection string for the production database, and through XDT you instruct VS 2010 to dynamically replace the connection string in the web.config file with the connection string in the web.config.release when generating the production version of web.config which will be in the final package…
Ok XDT wanted some explanation so now let’s start the actual packaging and deployment.
If you expand the web.config node, you will find that by default there will be web.config.debug and web.config.release. As explained, these correspond to the default build configurations (Debug and Release) respectively. In our case we are going to be deploying the release version, so go ahead and edit the web.config.release file to read as follows:
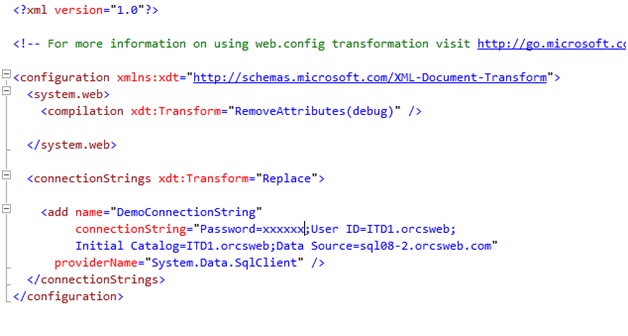
Here we are using XDT (xdt:Transform=”Replace”) to instruct VS 2010 to replace the development-time connection string available in web.config with the release (or production) time connection string available in the web.config.release. This is the connection string supplied by the hosting company. The final web.config file in the final package will contain the updated connection string.
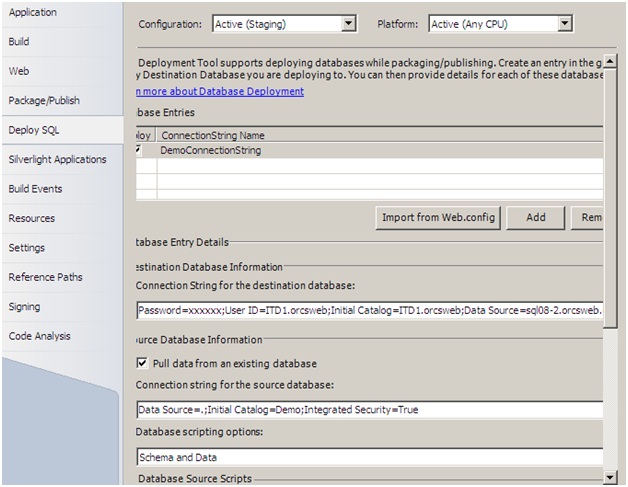
Now let’s set up VS to deploy our SQL database also…this solves the concern of deploying the database along with the application in a single click. Open the properties window of the project. You will find a new tab called Deploy SQL. In this tab set up the connection string of the development database which you want to deploy (you can make VS 2010 import this from the web.config file by clicking “Import from Web.config”) and then provide the destination URL where the database will be deployed. This will be the connection string provided to you by the hosting company. Instruct VS 2010 to include data while deploying and make it get schema and data…the below screen shot shows the configuration I used to deploy my application:
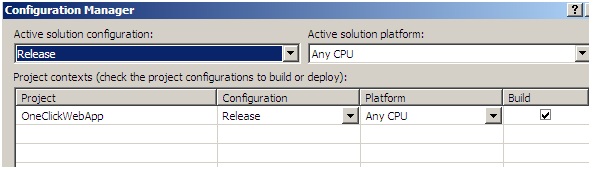
Ok so now you are ready to do the actual deployment. First make sure that the “Release” build configuration for your project is selected as shown below.
Now right-click the project node and select the new “Publish…” option. A new window will open where you will enter the publish settings:
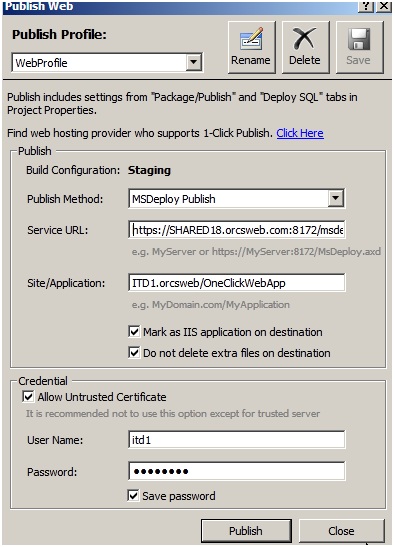
- Publish Profile: you are allowed to create a profile for your settings so that you are not required to type them again and again for each deployment. For example I have created two profiles; one to deploy to the hosting company – which I am using now, and another one to deploy to another server which I will show you next.
- Publish Method: Select MSDeploy Publish to perform the publishing based on MSDeploy
- Service URL: recall that this is the URL provided to us by the hosting company which contains the IIS handler
- Site/Application: the name of the IIS web site to deploy to – also provided by the hosting company. And the name of the application (virtual directory) under which to deploy.
- Allow Untrusted Certificate: select this since we are deploying on a demo server and the certificate won’t probably be from a trusted CA (like VeriSign)
- Username/password: the account provided by the hosting company which will have permission to call MSDeploy and perform the deployment.
Ok, so now we are ready. Click publish and your web app and the database (with the data) will be deployed to the hosting company.
Behind the scenes VS 2010 (and MSDeploy) created a packaged zip file of your application along with a manifest xml file and used these two files to publish your application to the destination server. The package file can be found by default on “obj\Release\Package\”; although you can change this in the “Package/Publish” tab of the properties window of your project.
Actually, if by the time you are reading this article the testing account is still valid and the application is still deployed then you can check the application on the following URL:
http://206.72.116.231/oneclickwebapp/Default.aspx
Deploying on another Server
Now let’s discuss the case when you own your production server and want to deploy on it. In this case the settings on the development box will be almost the same. However, now you have the responsibility of configuring MSDeploy on the production server to listen for deployment requests.
In my case, I will deploy the same application I showed you on the same machine on IIS 7 on win server 2008. So the first and most important mission I have is to configure MSDeploy on my machine (acting as server) to listen for deployment requests.
First make sure IIS 7 is installed on the server.
Now you have to download the MSDeploy package. You can get it from here:
Run this package on the server and install the following components:
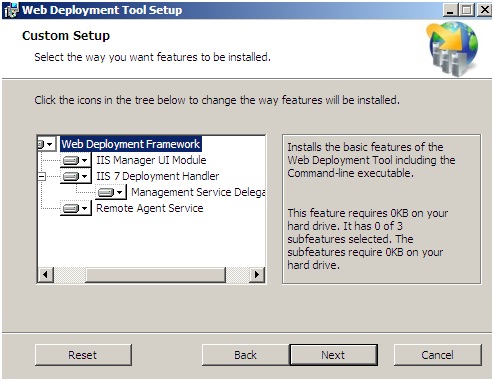
The above components install MSDeploy along with its management UI and the IIS 7 handler for managing deployment requests. The management service will be the actual service listening for requests. The Remote Agent Service is another MSDeploy option used mainly for command-prompt deployment but is not required for VS 2010 1-Click Publishing.
Now make sure that services “Web Deployment Agent Service” and “Web Management Service” are started and have a Startup type of “Automatic”.
The final step is to enable remote connections for IIS (intermgr.exe –> Management Service –> Enable Remote Connections).
Now you have the server ready to handle VS 2010 publish requests.
Back to our project in VS 2010. Edit web.config.release to have the connection string of the server instead of the hosting company (in my case since it is the same server, I will have the same connection string as the one in the web.config file).
Now on the Deploy SQL tab, also edit the connection string to point to the production server (again same server for me…) and select to move data and schema. Now you are ready to publish, select the “Publish…” tab and enter the below settings:
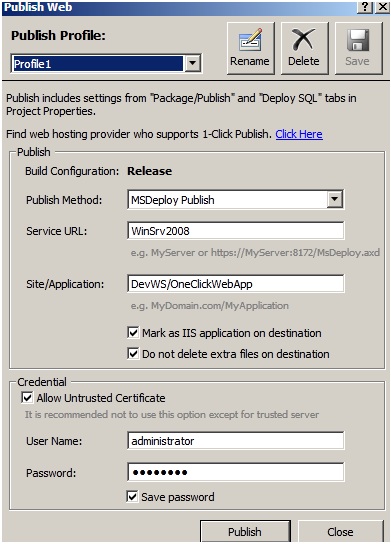
Notice that I have created a second profile for publishing. The settings are similar to the ones I used for hosting company’s profile; just note that in the Service URL I just supplied the name of the server to deploy to. This is the server I have configured MSDeploy service on; in this case my same dev machine…
Summary
With all the great features coming in VS 2010 and .NET 4.0, 1-Click Publishing is one of the most important in my opinion. The ease of use and simplicity really stands out. The fact that you now can deploy your database and your configuration changes along with your application in one zipped file is great! Add to this that you can do this without even leaving your development machine is really cool…
